When embarking on the journey to make your home more accessible, it’s essential to consider the guidelines set forth by the Americans with Disabilities Act (ADA). The ADA provides comprehensive requirements and recommendations for accessible design, ensuring that individuals with disabilities can enjoy equal access to public and private spaces. While the ADA primarily addresses commercial spaces, many of its principles can be applied to homes to create a universally accessible environment.
Let’s take a look at some key recommendations and products offered at Mobility City locations across the US that can help you prepare your home to be accessible!
Outdoor Home Accessibility Modifications
When it comes to creating an accessible home, the focus often falls on interior spaces, but it’s equally crucial to consider the exterior, starting with your garage. Your garage is not merely a place to store your vehicle; it’s the gateway to your home, and ensuring it’s wheelchair-accessible is an essential step in enhancing mobility and independence for residents and visitors with mobility challenges.
Let’s take a look at some key areas related to the outside of your home:
Making Your Garage Accessible
The first and perhaps most critical aspect of garage accessibility is the height of the garage door opening. A wheelchair-accessible garage should have a minimum of 9 feet of vertical clearance from the finished floor. This specific measurement is crucial as it ensures that raised-top, wheelchair-accessible vans can comfortably enter and exit the garage without any obstruction or risk of damage.
Why 9 Feet Matters:
1) Accommodating Raised-Top Vans
Wheelchair-accessible vans often have raised roofs to provide adequate headroom for passengers in wheelchairs. These raised-top vans are a lifeline for individuals with mobility challenges, granting them the freedom to travel with ease and comfort. The 9-foot clearance ensures that these vehicles can smoothly navigate into the garage without any height-related constraints.
2) Safe and Unobstructed Entry
Beyond convenience, ensuring a 9-foot vertical clearance promotes safety. It eliminates the risk of the van’s roof or any assistive devices coming into contact with the garage door, preventing potential accidents or damage.
3) Universal Design
Accessibility isn’t just about meeting specific needs; it’s about creating spaces that can be comfortably used by people of all abilities. By adhering to this garage modification, you’re embracing universal design principles that benefit everyone who enters your home.
4) Ease of Vehicle Transfer
For individuals who rely on mobility aids or wheelchairs, transferring from a vehicle to their home is a daily necessity. A garage with the right vertical clearance streamlines this process, making it more efficient and less physically demanding.
Going Beyond Vertical Clearance
While ensuring the appropriate vertical clearance is paramount, there are other considerations to keep in mind to make your garage truly wheelchair-accessible:
- Accessible Entry
Ensure that the entrance to the garage is level, with no steps or uneven surfaces. A gently sloping driveway leading to the garage can also facilitate easy entry and exit for wheelchairs. - Adequate Lighting
Good lighting is essential, especially in the garage, where visibility is crucial. Well-placed lighting fixtures ensure that individuals with mobility challenges can navigate safely. - Accessible Controls
If your garage has an automatic door opener, consider installing accessible controls at an appropriate height. These controls should be easy to reach and operate from a seated position.
- Clear Pathways
Maintain clear and wide pathways within the garage to allow for maneuverability, ensuring there are no obstacles or clutter that could hinder movement. - Non-Slip Flooring
Choose flooring materials that are slip-resistant to reduce the risk of accidents, especially in wet or icy conditions.
By addressing these aspects, your garage can become a model of accessibility, providing a safe and welcoming entry point to your home. Creating an accessible garage not only benefits those with mobility challenges but also fosters inclusivity and convenience for all who pass through its doors.
Creating Parking Spaces to Accommodate for Accessible Vehicles
When it comes to making your home truly accessible, it’s important to consider not only the interior modifications but also the exterior spaces, starting with accessible parking. For individuals with mobility challenges, having properly designed parking spaces can make a world of difference in terms of convenience and safety.
Size and Clearance
Creating accessible parking spaces is an essential step in ensuring that individuals with mobility challenges can access your home with ease. Here are some key considerations:
1. Dimensions
Handicapped parking spaces should have specific dimensions to accommodate both vehicles and the individuals who use them. These spaces should be at least 12 feet wide and 6 feet deep. This generous size allows for ample room for vehicles and provides space for wheelchair users to maneuver comfortably.
2. Loading and Unloading Space
In addition to the dimensions mentioned above, accessible parking spaces should have a minimum of 48 inches of clearance on one side. This clearance is crucial for loading and unloading wheelchairs and mobility aids. It allows individuals to exit their vehicles safely and have enough room to move around freely.
3. Accessibility Features
To ensure that these parking spaces are usable for everyone, it’s important to include accessibility features such as curb cuts or ramps. These features make it easier for wheelchair users to transition from the parking area to the adjacent walkways.
4. Signage
Clearly mark accessible parking spaces with the internationally recognized handicapped parking symbol. The use of proper signage helps not only in identifying these spaces but also in deterring unauthorized use for neighbors and deliveries.
5. Proximity to Entry Points
Whenever possible, place accessible parking spaces close to the entry points of your home. This minimizes the distance that individuals with mobility challenges need to travel, enhancing their convenience and reducing physical strain.
6. Van-Accessible Spaces
In addition to standard accessible parking spaces, consider including van-accessible spaces. These spaces are wider to accommodate wheelchair-accessible vans with side-loading ramps or lifts. Van-accessible spaces are especially important for those who rely on larger mobility vehicles.
7. Well-Maintained Surfaces
Ensure that the parking area and pathways leading from the parking space to your home are well-maintained. Smooth, level surfaces prevent tripping hazards and make navigation easier for individuals with mobility challenges.
8. Consideration for Loading and Unloading
If possible, create a dedicated space near the accessible parking for loading and unloading items such as groceries or assistive devices. This additional space can significantly enhance the usability of the parking area.
By implementing these considerations in your accessible parking spaces, you are not only meeting legal requirements but also making a significant impact on the daily lives of individuals with mobility challenges. These spaces provide the necessary room and accessibility features to ensure safe and comfortable access to your home, promoting inclusivity and independence for all.
Walkways and Ramps
Creating accessible pathways around your home is a fundamental aspect of enhancing mobility and inclusivity for individuals with diverse abilities. Well-designed walkways and ramps ensure that everyone can navigate your property safely and comfortably. Here, we delve into the importance of these features and the specific considerations to keep in mind.
Walkway Width
The width of walkways connecting your front door, parking areas, or garages is a critical consideration in ensuring accessibility. Here’s why it matters:
1. Ample Space for Maneuvering
Walkways should be at least 48 inches wide. This generous width allows individuals who use wheelchairs or mobility aids to move comfortably and without restriction. It also accommodates caregivers or family members who may be assisting.
2. Safe Passage
A wider walkway minimizes the risk of collisions or accidents, especially when multiple people are using the path simultaneously. It ensures that individuals with mobility challenges can travel without feeling cramped or unsafe.
3. Easy Navigation
For those using mobility devices, such as wheelchairs or walkers, a broad walkway provides the space needed for turning and navigating turns or corners. This makes moving around your property more straightforward and less physically taxing.
4. Inclusivity
A wide walkway embraces the principles of universal design, making your home inviting and accessible to everyone, regardless of their mobility status. It’s a simple yet powerful way to promote inclusivity.
5. Emergency Evacuation
In case of emergencies, such as fires or medical situations, spacious walkways provide an unobstructed path for swift and safe evacuation.
Ramps
Ramps are indispensable for bridging height differences and ensuring that all areas of your property are accessible. Here are key considerations for ramps:
1. Slope
Ramps should not exceed a slope of 1 inch per foot. This slope provides a gentle incline that is manageable for individuals using wheelchairs or other mobility devices. A gradual slope ensures that ascending or descending the ramp is not overly strenuous.
2. Width
To accommodate wheelchair accessibility, ramps should be at least 36 inches wide. This width allows for comfortable passage and prevents bottlenecks.
3. Long Ramps
If ramps are longer than 30 feet, it’s advisable to include a middle landing. This landing provides a resting point and facilitates maneuvering for wheelchair users. It’s essential for preventing fatigue during longer ascents or descents.
4. Secure Handrails
All ramps and porches must be equipped with secure handrails. Handrails provide crucial support and stability for individuals using ramps. They enhance safety and confidence, especially when navigating inclines.
5. Material Selection
The material used for ramps should be slip-resistant, even when wet. This prevents accidents and ensures stability during various weather conditions.
6. Threshold Considerations
Ensure that ramps have a smooth transition from the walkway or porch to prevent tripping hazards. A well-designed threshold ensures a seamless transition for all users.
By incorporating these features into your walkways and ramps, you’re not only meeting accessibility requirements but also creating an environment that is accommodating and welcoming to individuals of all abilities. These modifications empower individuals with mobility challenges to move freely and independently around your home while fostering a sense of inclusivity and equality. In essence, accessible walkways and ramps are pathways to a more inclusive and compassionate living space.
Doorbell & Mailbox
When we think about making a home more accessible, we often focus on significant modifications like ramps and wider doorways. However, it’s the thoughtful attention to small details that truly enhances accessibility and inclusivity. Two such details are the placement of the doorbell and the mailbox, which, when optimized, can significantly improve the daily lives of individuals with mobility challenges. Let’s delve into these details:
Doorbell Height
1. Chair Height Installation
Installing the doorbell at chair height, which is typically around 48 inches from the floor, is a thoughtful and practical modification. Here’s why it matters:
- Ease of Access: Placing the doorbell at this height ensures that individuals who use wheelchairs or other mobility devices can easily reach it without straining or requiring assistance. It empowers them to announce their presence independently.
- Inclusivity: An accessible doorbell is not only about convenience but also about inclusivity. It demonstrates that you’ve considered the needs of all your visitors, regardless of their mobility status.
- User-Friendly: The concept of universal design emphasizes creating spaces and elements that are user-friendly for people of all abilities. Installing the doorbell at chair height aligns perfectly with this principle, making your home welcoming to everyone.
2. Audibility and Visual Alerts
Accessibility goes beyond physical reach. Ensure that the doorbell is loud enough to be heard throughout your home. This auditory component ensures that occupants can hear visitors, even if they are in a different room.
- LED Flashing Lights: To accommodate individuals with hearing impairments, consider adding LED flashing lights in addition to the traditional doorbell sound. These lights provide a visual alert when someone rings the doorbell, ensuring that nobody is left out.
- Customization: Many modern doorbells offer customization options for volume and chime type. Choose a setting that suits your household’s needs and preferences.
Mailbox
1. Chair Height Mailbox
Just as with the doorbell, placing the mailbox or mail slot at chair height is a practical and considerate adjustment.
- Independent Access: A mailbox at chair height enables individuals with mobility challenges to collect their mail without assistance. It empowers them to manage their correspondence independently, preserving their privacy and dignity.
- Reduced Strain: Bending or reaching to access a low mailbox can be physically demanding and uncomfortable. Chair height placement eliminates this strain and discomfort.
- Visual Aesthetics: Mounting the mailbox at chair height creates a more aesthetically pleasing and harmonious look for your home’s exterior.
- Easy to Install: Adapting your mailbox’s height is a relatively simple modification that can make a substantial difference in accessibility.
2. Mail Slot Considerations
If you have a mail slot instead of a mailbox, ensure that it’s positioned at an accessible height. This adjustment allows mail to drop directly into a reachable receptacle, minimizing the need to bend or stretch.
By thoughtfully addressing these small but essential details—doorbell height and mailbox placement—you’re not only enhancing the accessibility of your home but also making it more welcoming, comfortable, and inclusive for all visitors and residents. These modifications reflect a commitment to creating a living space where everyone can enjoy equal convenience and independence.
Front Door & Home Entrance Modifications
Your front entrance is not just a physical barrier; it’s the welcoming threshold to your home. Ensuring that it’s accessible and inclusive is not only a matter of convenience but also a statement of hospitality. Here, we explore essential front door and entrance modifications that set the tone for a more accessible and inviting living space:
Front Door Handle
- Easy-to-Grasp Design: The front door handle is the very first point of interaction for anyone entering your home. It should be designed for ease of use, particularly for individuals with limited hand strength or dexterity.
- Single-Lever Operation: Opt for a single-lever door handle that can be operated with one hand. This design allows for straightforward and intuitive use, whether you’re pushing, pulling, or turning the handle.
- Ergonomic Considerations: Choose a handle that is ergonomically designed, with a comfortable grip that minimizes strain on the hand and wrist.
- Leverage and Assistance: A well-designed door handle not only benefits individuals with mobility challenges but also makes it easier for anyone, including those carrying items or holding hands with children, to enter your home.
Front Door Deadbolt
- Dual-Function Release Mechanism: Security and accessibility can coexist at your front door. Opt for a front door deadbolt with a dual-function release mechanism.
- Security: A deadbolt provides essential security for your home. However, traditional deadbolts can be challenging to operate for individuals with limited hand strength. A dual-function release mechanism combines security with accessibility.
- Ease of Operation: This mechanism typically includes a lever or thumb turn on the inside that is easy to grasp and operate. It allows for quick and straightforward unlocking and locking of the door.
- Convenience: It ensures that individuals with mobility challenges can independently enter and exit your home without relying on assistance to operate the deadbolt.
Front Door Width
- Accessibility through Width: The front door must be wide enough to accommodate wheelchairs and mobility aids comfortably.
- Minimum Width: Ensure that the front door is at least 36 inches wide. This width allows for easy passage, particularly for individuals using wider wheelchairs or mobility scooters.
- Clearance Space: In addition to the door’s width, provide at least 32 inches of clearance on the latch side of the door. This clearance allows for maneuvering, especially when opening the door while positioned in front of it.
- Full-Length Sidelight or Double Peephole: Enhance visibility and security at your front entrance.
- Sidelight: Consider adding a full-length sidelight next to the front door. This provides ample natural light and allows occupants to see who is outside, promoting safety and peace of mind.
- Double Peephole: Alternatively, install a double peephole at different heights to accommodate individuals of varying heights, including those using wheelchairs.
Front Stoop
- Ample Space: If your front entrance includes a stoop or porch, ensure it provides adequate space for maneuverability.
- Minimum Dimensions: Ideally, the front stoop should measure at least 5 feet by 5 feet. This space allows individuals using wheelchairs or mobility aids to approach the door comfortably and safely.
Threshold
A sloped threshold is an essential feature that ensures smooth and safe transitions.
Each exterior door should have a threshold that is no higher than ½ inch from the bottom of the door. This minimal height allows for effortless movement of wheelchairs or other mobility devices, preventing tripping hazards.
A well-designed threshold ensures a smooth transition between indoor and outdoor spaces, enhancing accessibility and preventing accidents.
By implementing these front door and entrance modifications, you’re not only making your home more accessible but also creating an inviting and inclusive space for all. Your front entrance sets the tone for the rest of your home, reflecting your commitment to ensuring that everyone can enjoy the warmth and comfort of your living space.
Accessible Bedroom Modifications
The bedroom is more than just a place to sleep; it’s a haven of rest, relaxation, and personal space. When it comes to making your bedroom accessible, you’re not only enhancing comfort but also fostering independence and quality of life for individuals with mobility challenges. Let’s delve into the essential bedroom modifications that can transform this space into an accessible and comforting sanctuary:
Bedroom Door
- Width and Accessibility
The bedroom door should be wide enough to accommodate wheelchairs and mobility aids comfortably. Ensure that the bedroom door is at least 32 inches wide. This width provides ample space for maneuvering wheelchairs and other mobility devices. - Door Handle Design
The door handle is a critical element for easy access. Opt for a single-lever door handle that can be operated with one hand. This design is user-friendly and ensures that individuals with limited hand dexterity can easily open and close the door.
Pathways
- Ample Pathways
Clear pathways within the bedroom are essential for ease of movement and accessibility. Maintain a 36-inch-wide pathway on each side of the bed and Ensure that the bedroom door is at least 32 inches wide. This width provides ample space for maneuvering wheelchairs and other mobility devices. - Door Handle Design
The door handle is a critical element for easy access. Opt for a single-lever door handle that can be operated with one hand. This design is user-friendly and ensures that individuals with limited hand dexterity can easily open and close the door.
Bed Height
The height of the bed plays a crucial role in accessibility and ease of use.
Ensure that the mattress is no higher than 22 inches from the floor. A lower bed height makes it easier for individuals with mobility challenges to transfer in and out of bed independently.
For more information or assistance on hospital bed rentals and sales near you, contact one of our Mobility City locations today as we offer a full range of beds for people of all needs!
Ceiling Reinforcement
Consider reinforcing the bedroom ceiling to accommodate pulleys or lifting mechanisms if needed.
If you are looking for assistance in choosing a bed or patient lift, our experienced technicians at Mobility City are here for you. We offer patient lift sales, repairs, and maintenance and can come to your home to do the work!
Ceiling reinforcement ensures that lifting equipment can be safely installed. These mechanisms can assist individuals with mobility challenges in transferring to and from the bed, promoting independence and reducing the risk of injuries.
Controls
Access to essential controls within the bedroom is paramount for comfort and independence.
- Ensure that thermostats are placed within 48 inches of the floor. This height allows individuals to adjust the room temperature comfortably without requiring assistance.
- Drapery wands or curtain controls should also be within 48 inches of the floor. This accessibility feature enables individuals to manage natural light and privacy easily.
- Make sure that lamp controls are within the same accessible range (48 inches from the floor). This allows for independent control of lighting.
By implementing these bedroom modifications, you’re not only enhancing accessibility but also creating a nurturing and accommodating environment. The bedroom should be a space where individuals with mobility challenges can enjoy the comfort and freedom to move, rest, and sleep without barriers. It’s a place where independence is fostered, and quality of life is improved. These modifications empower individuals to maintain a sense of control and self-sufficiency in their daily routines, promoting overall well-being and peace of mind.
Closet Modifications to Help with Accessibility in the Home
A well-organized closet is not just about aesthetics; it’s a vital component of accessibility within your home. An efficiently designed closet makes daily routines more manageable, especially for individuals with mobility challenges. Let’s delve into the key aspects of closet modifications that enhance accessibility and convenience:
Closet Doors
The choice of closet doors plays a significant role in accessibility and convenience. Door options would include:
- Slide Doors or Bi-Fold Doors
Opt for slide doors or bi-fold doors. These door types are preferred because they do not swing outward into the room, obstructing pathways and making it challenging to navigate for individuals using wheelchairs or mobility aids. - Clearance Space
When the closet doors are open, ensure there is a minimum front clearance of 48 inches of clear space from the edge of the opened door. This clearance allows unrestricted access to the closet’s contents. - Maneuvering Space for Swinging Doors
If you prefer swing doors or bi-fold doors, plan for adequate maneuvering space. This space should match the width of the door opening when fully extended and have a minimum of 48 inches perpendicular to the doorway. This design enables comfortable movement of the doors and easy entry into the closet.
Shelving & Rods
The placement of closet rods and shelving is critical for an accessible closet. Keep the following items in mind when you are setting up closet shelving and rods:
- Height Placement
Ensure that closet rods and shelving are positioned within 48 inches of the floor. This height is comfortable for individuals with mobility challenges, allowing them to reach their clothing and belongings without excessive effort or strain. - Shelf Depth
Keep shelves shallow, with a maximum depth of 18 inches. Shallow shelves make it easier to see and access items, as they are closer to the front of the closet. This prevents items from getting lost in the back of deep shelves. - Slide-Out Shelves and Accessories
Consider installing slide-out shelves or accessories within the closet. These additions make it effortless to access items stored at the rear of the closet, reducing the need to reach or strain. - Adjustable Shelving
If possible, choose adjustable shelving. Adjustable shelves provide flexibility in configuring the closet’s layout to meet individual needs and preferences. They can be customized to accommodate various clothing and storage requirements.
- Clear Floor Space
Maintain a clear floor space within the closet. This space ensures that individuals using wheelchairs or mobility aids can enter the closet and access items without obstacles. An unobstructed floor also allows for easy wheelchair maneuverability. - Adequate Lighting
Adequate lighting is essential within the closet. Well-placed lighting fixtures or motion-sensor lights ensure that the closet’s contents are well-illuminated and easily visible. Proper lighting enhances safety and facilitates quick and accurate item selection.
By implementing these closet modifications, you’re not only enhancing accessibility but also simplifying daily routines. An organized and accessible closet empowers individuals with mobility challenges to select clothing and personal items with ease, promoting independence and efficiency. These modifications also contribute to inclusivity, making the closet a user-friendly space for everyone, regardless of their mobility status.
Creating an Accessible Kitchen
The kitchen is often considered the heart of the home, where meals are prepared, conversations are shared, and memories are made. To ensure that this vital space is inclusive and accessible to everyone, especially individuals with mobility challenges, it’s essential to make thoughtful kitchen modifications. Let’s explore the key aspects of creating an accessible kitchen:
Cabinets
Lower cabinets should have shelves that are within easy reach. Make sure you consider:
- Shelf Height
The lowest shelves of upper cabinets should be no higher than 48 inches from the floor. This height allows individuals to access commonly used items without the need for step stools or excessive stretching. - Upper Cabinet Height
Mount upper cabinets 15 inches above the countertop. This clearance provides ample space for individuals to work comfortably on the countertop below. - Full-Extension Drawers
Choose lower cabinets with full-extension drawers rather than doors. This design allows for easy access to the cabinet’s contents without the need to bend or reach deep into the cabinet.
Countertops & Sink
The kitchen layout should accommodate a forward wheelchair approach to the sink and countertops. You’ll want to consider:
- Leg Room
Ensure that there is adequate legroom under countertops and sinks to accommodate a wheelchair comfortably. This space allows individuals to roll their wheelchairs up to the sink or countertop. - L- or U-Shaped Layout
L- or U-shaped countertops work well in accessible kitchens. These layouts provide open spaces for wheelchair maneuverability and convenient access to various areas of the kitchen. - Counter Space
There should be at least 30 inches of counter space around the cooktop and sink. This space allows for meal preparation and cooking without congestion. - Accessible Faucet
Choose a kitchen faucet with a single lever and a high-arc design with a pull-out spray head. These features make it easier to operate the faucet with one hand and facilitate access to the sink. - Pullout Cutting Boards
Consider installing pullout cutting boards in lower cabinets. These boards can be extended to create a convenient workspace for chopping and meal preparation.
Appliances
Appliances in the kitchen should be designed for accessibility and ease of use. We recommend considering:
- Operable from Chair Height
Ensure that appliances and the sink are operable from chair height. This feature allows individuals using wheelchairs to access and use the appliances independently. - Dishwasher Placement
Mount the dishwasher at least 6 inches from the floor. This placement ensures that the dishwasher’s controls and loading racks are easily accessible. - Dishwasher Drawer-Style
Opt for a dishwasher with a drawer-style opening rather than a hinged door. Drawer-style dishwashers are easier to load and unload. - Microwave Placement
Install microwaves below countertop height to ensure that the controls and interior are within easy reach for individuals using wheelchairs.
- Wall-Mounted Ovens
If wall-mounted ovens are used, position them so that the oven controls are around 48 inches from the floor. This height allows for comfortable access to the oven. - Wall Switches and Outlets
Proper placement of wall switches and outlets is crucial for accessibility.
- Switch and Outlet Height
Mount wall switches and outlets between 32 and 36 inches from the finished floor. This height ensures that controls and electrical access are within reach for individuals using wheelchairs.
These kitchen modifications go a long way in creating an accessible culinary haven where individuals with mobility challenges can prepare meals, socialize, and engage in the joys of cooking without limitations. An accessible kitchen promotes independence and inclusivity, fostering a sense of empowerment and belonging for all who use this central space in the home.
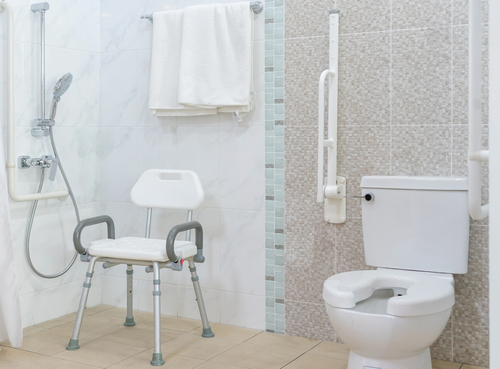
Bathroom Safety & Accessibility
The bathroom is undoubtedly a vital space in any home, but it can also be a place where accidents and injuries are more likely to occur, especially for those with mobility challenges. To mitigate risks and ensure accessibility, thoughtful bathroom modifications are essential. Here, we delve into the key aspects of bathroom modifications that prioritize safety and inclusivity:
- Bathroom Door
A wider bathroom door is the first step in enhancing bathroom accessibility. - Door Width
The bathroom door should be at least 32 inches wide. This width allows for easy passage and accommodates mobility aids like wheelchairs and walkers. - User-Friendly Handle
Choose a door handle with a single-lever design that can be easily grasped and operated with one hand. This simplifies the process of opening and closing the bathroom door. - Wall Reinforcement
Reinforcing bathroom walls is crucial to provide secure anchor points for grab bars and wall-mounted shower seats.
All bathroom walls should be reinforced to support grab bars capable of withstanding a minimum of 250 pounds of weight. Properly installed grab bars offer stability and support for individuals during transfers, while using the toilet, and in the shower.
Toilet
The design of the toilet area should prioritize accessibility and safety. Be mindful of:
- Toilet Height
Mount the toilet at a height ranging from 33 to 36 inches from the floor. This range ensures that individuals can comfortably sit down and stand up, minimizing strain and promoting independence. - Toilet Seat Height
Install a toilet seat that is 17 to 19 inches from the floor. This seat height is comfortable for most individuals and aligns with accessibility standards. - Clear Pathway: Maintain a clear pathway to the toilet, with a width of at least 36 inches. This unobstructed space allows for easy wheelchair access and maneuvering.
- Grab Bars
Install grab bars behind and beside the toilet. These bars provide essential support for individuals while using the toilet and can aid in transfers. Ensure that they are securely anchored to reinforced walls.
Sink
The sink area should be designed to accommodate a wheelchair. Things to keep in mind include:
- Sink Height
Mount the sink no more than 34 inches from the floor. This height allows for a comfortable forward wheelchair approach. - Clearance Space
Provide adequate clearance in front of the sink to allow for forward wheelchair approach. A minimum space of 30 inches by 48 inches is typically recommended. - Sink Faucet Design
Choose a sink faucet with a single-lever design that can be easily operated with one hand. This design ensures usability for individuals with limited hand dexterity.
Shower
Roll-in showers are ideal for wheelchair users and those with mobility challenges. Here are a few key items to consider:
- Shower Seat Height: Install a shower seat that is 17 to 19 inches from the floor. This seat height facilitates safe and comfortable showering for individuals with mobility challenges.
- Barrier-Free Entrance: Ensure that the roll-in shower has a barrier-free entrance, free of doors, curbs, or lips. This design allows for seamless entry and exit, reducing tripping hazards.
- Handheld Shower Spray: Provide a handheld shower spray unit with a hose that is at least 60 inches long. This feature allows individuals to shower while seated and facilitates easy reach for bathing.
Bathtub
Bathtubs should be designed with safety and accessibility in mind. Focus on:
- Faucet Placement
Center the faucet and controls on the longest side of the bathtub for ease of use. - Grab Bars
Include horizontal grab bars on each side of the bathtub, with a minimum length of 24 inches. These grab bars offer stability and support when entering and exiting the bathtub.
Some of our most popular products available in our showrooms are our bathroom accessibility items. Check out our blog on the top 10 bathroom safety products at Mobility City.
Additional Modifications for Enhanced Home Accessibility
In addition to specific room-focused modifications, there are several miscellaneous modifications that contribute to overall home accessibility. These adjustments ensure a safer and more accommodating environment for individuals with mobility challenges and promote a sense of comfort and independence throughout the entire home. Let’s delve into these miscellaneous modifications:
Stairlift
For homes with multiple levels, a stairlift can be a game-changer.
Stairlift Installation
Consider investing in a stairlift to provide easy access between levels. Stairlifts are motorized devices that transport individuals up and down stairs, eliminating the need to navigate steps manually. They are particularly beneficial for individuals with mobility challenges who have difficulty with stairs.
For more information things to consider when buying a stair lift on stair lifts, check out some of our other blogs or contact a franchise near you today to discuss stair lift sales and installation processes!
Thresholds
Ensure smooth transitions between rooms and spaces by addressing thresholds.
Keep all doorway thresholds no higher than ½ inch. Lower thresholds eliminate tripping hazards and make it easier to transition from room to room, especially for individuals using wheelchairs or walkers.
Flooring
The choice of flooring materials plays a crucial role in accessibility. We recommend:
- Avoiding Carpets
Wherever possible, avoid the use of carpeting. Carpets can create friction, making it challenging for wheelchair users to move around. Additionally, carpeting can pose difficulties for individuals with mobility aids or those at risk of tripping. - Low-Pile Carpet
If you must use carpet, select low-pile options. Low-pile carpets have shorter fibers, making them smoother to navigate and easier to clean. Pair them with a ¼-inch pad for added comfort and stability.
Door Handles
Properly positioned door handles enhance ease of use throughout the home.
Mount all door handles at a height of 36 inches. This height is easily reachable for individuals with varying mobility levels and ensures comfortable access to rooms.
Interior Doors
Interior doors should operate effortlessly and require minimal force to open and close.
Ensure that all interior doors open easily with no more than five pounds of force. Doors that swing smoothly facilitate seamless movement between rooms and improve accessibility.
Interior Hallways
The width of interior hallways should allow unobstructed passage.
Maintain a minimum hallway width of at least 42 inches. Wider hallways provide ample space for maneuvering with mobility aids and accommodate the passage of wheelchairs or walkers comfortably.
Window Sills & Controls
Window features should be designed with accessibility in mind. Keep window sills no more than 30 inches from the floor. Lower window sills allow individuals of varying heights and mobility levels to enjoy natural light and views.
Position window controls no more than 24 inches from the floor. Lower control placement ensures that window adjustments are easily reachable, making it convenient for everyone to operate windows.
Electrical Outlets
Properly placed electrical outlets contribute to convenience and accessibility. Mount all electrical outlets 12 to 16 inches from the floor. This height makes it easier to access power sources, especially for charging devices and plugging in appliances.
Light Switches
Install illuminated, rocker-style light switches at a height of 42 inches from the floor. Illuminated switches are easier to locate and operate, while the height accommodates individuals of varying heights and mobility levels.
These miscellaneous modifications, when integrated into your home, create a more accessible and user-friendly living environment. They contribute to safety, comfort, and independence, allowing individuals with mobility challenges to navigate their home with confidence and ease. Overall, these modifications promote inclusivity and ensure that the home is welcoming and accommodating for everyone.
Together with Mobility City’s support and product lines, you can transform your home into a safe, comfortable, and inclusive environment for all its occupants. Remember, accessibility is about enhancing independence and improving the quality of life, and it’s an investment that pays off in countless ways.
For information on the products and services we offer to make your home more accessible, find one of our Mobility City locations near you today!